Port and Vulnerability Scanning
Network Discovery
- Wireshark: packet sniffer to visualize traffic in our network interface. Passive method
- eth0: local wired network
- ARP packages
- DHCPv6 packages: with TCP/IP v6
- eth0: local wired network
-
netdiscover: send ARP packages actively or passively
netdiscover -i eth0 -r 10.0.2/24 - Check ARP tables from my machine
arp -a. - ARP requests: only works at local network level
-
ICMP requests: for exernal petitions, sent 1 package to a sequential network range
for i in $(seq 3 254); do ping -c 1 10.0.2.$i; done - DNS requests:
-
Configure DNS servers include our target dns and ip address
nano /etc/resolv.conf -
wfuzz: scan, choose a dictionary to use, ignore empty responses
wfuzz -Z -c -w /usr/share/wordlists/wfuzz/general/common.txt --hh=0 FUZZ.hackbysecurity.com- dictionary secList: common subdomains we can use
-
-
NetBIOS requests
nbtscan -r 10.0.2.0/24
Port Scanning
- TCP CONN: a complete connection.
-
Send request to a closed port (ie 20). Response is connection refused [RST, ACK].
nc 10.0.2.4 20 -
Send request to an open port. Response is [SYN, ACK]
nc 10.0.2.4 21
-
- TCP SYN: similar to TCP CONN but once get’s a reply, it aborts the connection
-
Send request, response is [SYN, ACK]
hping3 10.0.2.4 --scan 20 -S
-
-
TCP Null: use only in Linux/Unix. Send an empty request. If there is no reply, port is open or filtered by a firewall. If returns an error, port is closed
hping3 10.0.2.4 --scan 20 -Y -
TCP Fin: use only in Linux/Unix. Send a request with End connection value. If no answer, port is open. If error, port is closed or filtered
hping3 10.0.2.4 --scan 20 -F -
TCP XMAS: use only in Linux/Unix. Similar to Fin, we receive a RST package if port is closed. We send FIN, URG and PUSH
hping3 10.0.2.4 --scan 20 -UPF -
TCP ACK: looks for ports that are filtered by a firewall. When we send an ACK, if we receive reply it resets connection (RST). If there is no reply, port is filtered by a firewall.
hping3 10.0.2.4 --scan 20 -A
-
UDP: you may receive corrupted data (i.e. poor audio quality). Much faster than TCP. UDP header size is 8bytes (TCP is 16bytes). Scan takes longer than TCP
hping3 10.0.2.4 --scan 20 -2
Vulnerability Scanning
- Vulnerability types
- Config: user, or pre-default configs
- Application: buffer overflow, SQL injections, XSS, etc.
- Design: inherent to the protocol or architecture
-
Connect to the vulnerable system
nc 10.0.2.4 21 -
Check response if has a vulnerability (there is exploit-db.com in kali)
searchexploit vsFTPd 2.3.4 -
Try default configs (i.e. User anonymous for FTP services)
nc 10.0.2.4 21USER anonymous PASSHELPLIST -
Gather server info
curl -I http://10.0.2.4searchexploit Apache 2.2.8 -
Check exploit info
cat /usr/share/exploitabledb/exploits/linux/dos/41769.txt
HPING
- Purpose: net discover, port and service analysis
-
ICMP for net discovery: add net interface (eth0, wlan0…), random for scanning order, send ping ARP packages, for discover active machines:
hping3 -1 -I eth0 --rand-dest 10.0.2.x -
Scan single port
hping3 -1 -I eth0 -p 21 10.0.2.x -
Scan a range of ports, with verbosity
hping3 -I eth0 -8 0-10000 -S -V 10.0.2.4 -
Search for specific ports that reply (5840) - are open ports:
hping3 -I eth0 -8 0-10000 -S -V 10.0.2.4 | grep "5840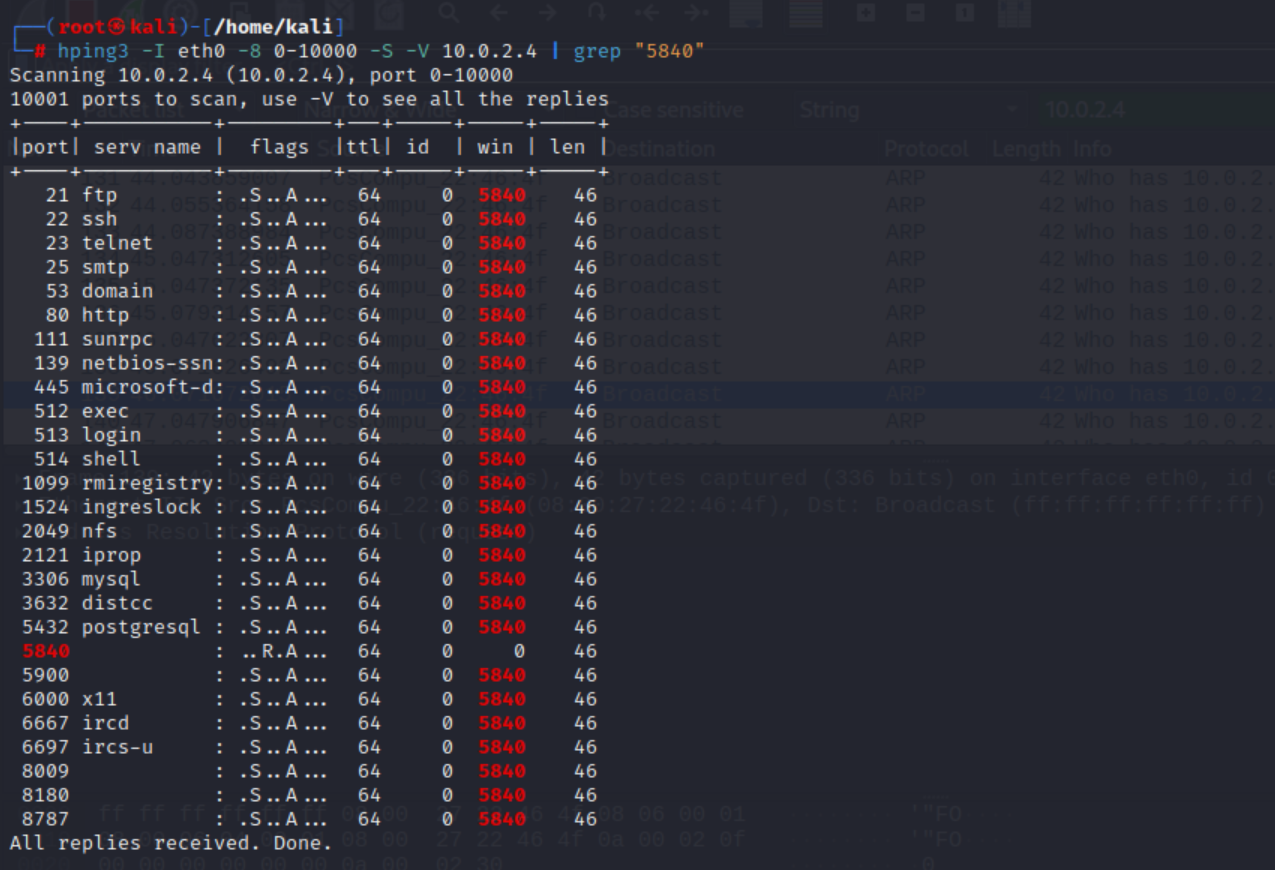
-
ICMP: send ping. Thanks to ttl, we can know which Operating System is operating (ttl=64 is linux).
ping -c 1 10.0.2.4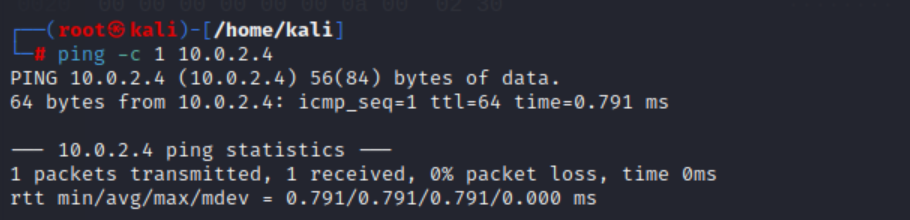
- Time To Live (TTL): is a timer value included in packets sent over networks that tells the recipient how long to hold or use the packet before discarding and expiring the data (packet). TTL values are different for different Operating Systems. So, you can determine the OS based on the TTL value
-
Supplant an identity by IP address to avoid any filter, using the flag
a. You can check in Wireshark how origin is now 10.0.2.1:hping3 -I eth0 -V -a 10.0.2.1 -p 80 -S 10.0.2.4hping3 -I eth0 -V --rand-source -p 80 -S 10.0.2.4 -
See TCP sequence used- Netbios port 139 or 80, so if we see a pattern we can impersonate next package:
hping3 -I eth0 -Q -p 139 -S 10.0.2.4 -
Fragment the packages, so it won’t interpret which info has and hosted destiny will re-build it.
hping3 -I eth0 -f --mtu 8 -p 80 -S 10.0.2.4
NMAP
-
Discover tasks. Will send packages (ARP, DNS (ns-lookup) ICMP, TCP/IPv6).
nmap -sn 10.0.2.0/24 -
If we want to work with another net interface (instead of eth0) we do. sS syn still. We see which ports are open. First verify host is active (ARP), then host name (DNS), then port scanning (TCP)
nmap -e eth0 -sS 10.0.2.4 - See on Wireshark if we receive a SYN ACK (connect - port open) or port closed (RST, ACK)
-
Set scanning range. In a remote machine there are 65.536 ports. We can omit the ping (-Pn) as we’ve done it on the previous steps. You can avoid the DNS lookup (-n)
nmap -e eth0 -sS -p 0-65535 -Pn -n 10.0.2.4 -
We can see which type of services are on each port adn version
nmap -e eth0 -sS -sV -p 0-65535 -Pn -n 10.0.2.4 -
Export info in the format we want (A - all, X -xml)
nmap -e eth0 -sS -sV -p 0-65535 -Pn -n -oX ./report 10.0.2.4 -
Use nmap script engine to check vulnerabilities in those services
nmap -e eth0 -sS -sV -p 21 -Pn -n -oX ./report21 --script=exploit,vuln 10.0.2.4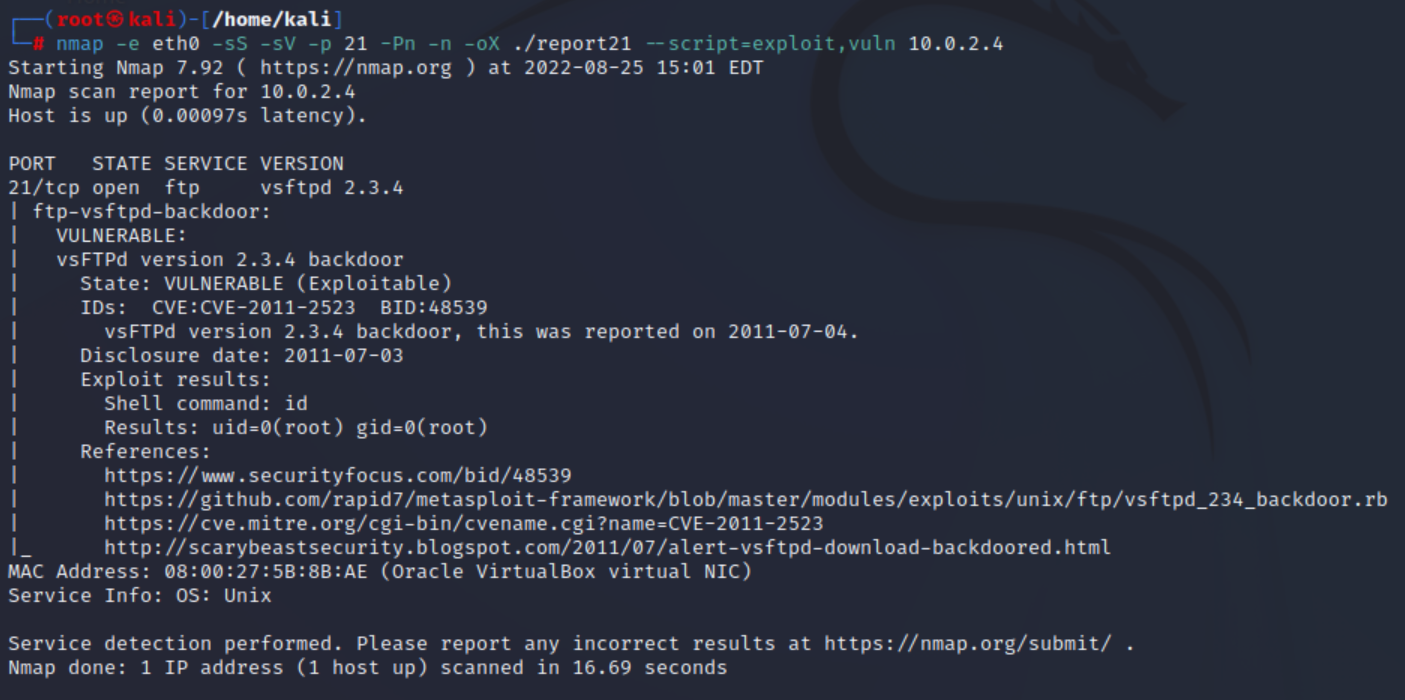
NESSUS
-
It does not come on Kali pre-installes (must install first)
/bin/systemctl start nessusd.service - Go to
https://kali:8834to configure scanner - New Scan and select template i.e.Advanced Scanning. You can schedule scans periodically
- You can set notifications via mail to send reports
- Functionalies
- Remote Host Ping: we can deactivate if we’ve done nmap already
- Fragile Devices: we can activate them all
- Wake-on-LAN: is the protocol name given to the so-called Magic Packet technology, for remotely waking up a remote host that may have been automatically powered-down because of its power management features. It will wait x mins. until OS boots. See more here.
- Port scan range:
0-65535 - Recommended SYN + soft detection
- Check certificates by enabling CRL
- Assessment: show potential false alarms, perform parallel tests
- Brute force: Hydra + add simple dictionary (
usr/share/wordlists/metasploit/default_users_for_services_unhash.txt&&default_pass_for_services.unhash.txt) - Web Applications: follow dynamically generated pages, and enable tests
- Samba - SMB (Server Message Block): free software provides file and print services for Windows clients.
- Brute force: Hydra + add simple dictionary (
-
Report
- Configure // Plugins: disable all Windows plugins to make the execution faster
OPENVAS
- Similar to Nessus
- Install on Kali Linux:
apt update apt install gvm - Configure
gvm-setupand save password - Initiate service
gvm-startand go tohttps://127.0.0.1:9392 - Add Target
- Add new Scan Task. Network Source Interface: eth0
NIKTO
- Analyze vulnerabilities on Web Services. 8 port, 443 port, etc.
- See help:
nikto -H - Use Nikto on an automated script (no ask, just send)
- Methods for Web Application Firewall (WAF) evasion.
- How do they work? using a set of rules to distinguish between normal requests and malicious requests. Sometimes they use a learning mode to add rules automatically through learning about user behaviour. Models: Blacklist based, Whitelist based and mixed
- See WAF evasion Techniques
- To not be very agressive set Pause seconds between tests
- Change
useragent, simulating we are using another browser - Run scan:
nikto -host http://10.0.2.4/. Explore each route per separate:nikto -host http://10.0.2.4/dvwa -
Example of result 1: we can see that adding
?-sallows us to see php code/dvwa/?-s: PHP allows retrieval of the source code via the -s parameter- See how login works
10.0.2.4/dvwa/login.php?-s
- See how login works
-
Example of result 2: methods allowed, TRACE should be disabled
Allowed HTTP Methods: GET, HEAD, POST, OPTIONS, TRACE - Example of result 3: we can see all the script files route
/phpMyAdmin/scripts/orphpinfo.php(try default credentials phpmyadminguest)
OWASP ZAP PROXY
- Zed Attack Proxy. Analyze vulnerabilities on Web Services.
- Download and install
- Analyse // Default Scan Policy // Modify
- Server Security // Path Traversal: it usually takes long, we set threshold and strength to Low
- Manual Explore: it will use our own browser as a proxy
- Automated Scan: include target URL
http://10.0.2.4- Spidering
- Vuln Scanning
- Generate HTML Report
METASPLOIT
- Start service
service postgresql start - Create tables for info indexing, run script
msfdb init - Open Metasploit console
msfconsole - See help info
help - Familiarize with all the modules with the
searchcommand. I.e.search ftpand filter by typesearch ftp type:auxiliarysearch ftp type:auxiliarysearch ssh type:auxiliarysearch dns type:auxiliary
- Start using scanners. You can start a module by calling its index
use 13. Look scanners for all services (services) availablescanner/ftp/ftp_versionscanner/ssh/ssh_versionscanner/dns/dns_amp
- Check
optionsandadvancedfor that module - Set our target IP or domain:
set rhosts 10.0.2.4 - Run module:
exploit -
Metasploit also allows you to run commands from the Operating System. I.e.
- from already installed software:
nitko -h http://10.0.2.4 - or from github projects/folders
python3 /opt/cupp/cupp.py
- from already installed software:
- Import results from other files. I.e. hosts:
db_import /home/kali/report - Now query the Database:
hosts&&services - Execute nmap and save results to the Database from Metasploit:
db_nmap - Set a global value to all modules:
setg rhosts http://10.0.2.4 - Set more variables. I.e. dns module
set domainname METASPLOITABLE.localset domainname localhostset interface eth0set verbose true
SEARCHSPLOIT
- It is already pre-installed in Kali Linux
- Make sure it’s up to date
apt updateandapt install exploitdb - Search vulnerabilities
searchsploit vsftpd - Combine with nmap report we exported before
searchsploit --nmap report > searchsploit-result - See the content of each code
searchsploit vsftpd&cd /usr/share/exploitdb/exploits - See exploits
cd unix/remote,lshead 17491.rb
WPSCAN JOOMSCAN CMSSCANNER
- Content Management platforms (Wordpress…) and plugin scanning
- WPScan is installed by default
wpscan --helpwpscan -e vp,vt,tt,cb,dbe,u1-20,m1-20 --url http://10.0.2.5:8585/wordpress --api-token XXX- Check uploaded content
/wordpress/uploads
- CMS Scanner
cd /opt/ git clone https://github.com/ajinabraham/CMSScan.git./setup.sh ./run.shlocalhost:7070
- Install JoomScan
apt install joomscan
FARADAY
- Useful for uploading reports and combine them within a team
- Install
apt install faraday - Based on a db:
service postgresql start - We initialize the server
faraday-server - Go to localhost:5985
faraday-manage init-dbfaraday-manage change-passwordfaraday-cli- Import nmap report of open ports